In 2022 AWS announced Amazon WorkSpaces Multi-Region Resilience offering a cost-effective, easy to manage solution to keep your users online and productive using standby WorkSpaces in another AWS Region during disruptive events. In this blog we will expand on this solution by utilizing Liquidware ProfileUnity and Peer Global File Service (“PeerGFS”) to replicate a user’s profile and data to the standby WorkSpaces offering a true business continuity and disaster recovery solution ensuring your end users remain productive during disruptive events.
This article is a collaboration between architects at AWS, Peer Software, and Liquidware. See below for more information about the authors.
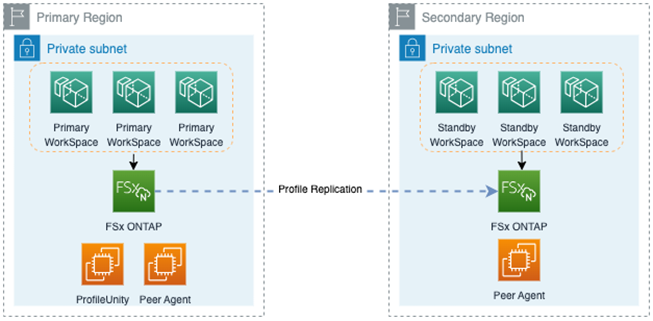
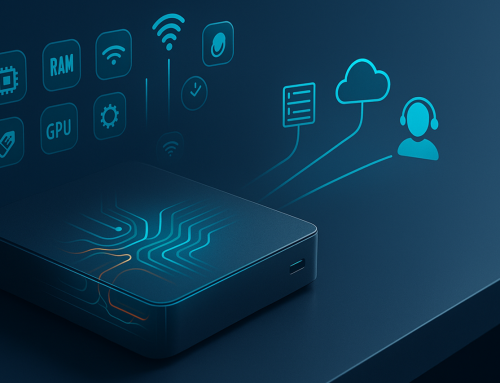
Overview of the solution
The following figure illustrates the solution. Liquidware ProfileUnity is utilized as the profile management portion while PeerGFS is utilized to synchronize files between the FSx for NetApp ONTAP instances.
Prerequisites
- An active Amazon WorkSpaces deployment
- Standby WorkSpaces deployed using Multi-Region Resilience for Amazon WorkSpaces admin guide
- FSx for NetApp ONTAP instances in both the primary and secondary WorkSpaces regions.
Note: Using FSx for NetApp ONTAP is not a requirement for this solution but it is recommended as FSx for NetApp ONTAP is a managed service with multi-az capability. Individual Windows-based file servers can be utilized if desired.
Setup
Step 1: Configure Amazon FSx for NetApp ONTAP
Note: If not using FSx for NetApp ONTAP, you may skip this section.
- Follow the prerequisite guide from the Peer Knowledge Base to configure your FSx for NetApp ONTAP instances for PeerGFS
Step 2: Deploy Liquidware ProfileUnity
ProfileUnity delivers User Environment Management for virtual desktop deployments such as AWS Workspace and AppStream 2.0. ProfileUnity decouples user profiles, settings, and data from the workspace. ProfileUnity separately stores and dynamically applies user profiles, configurations, and data to a Windows OS at login.
- Deploy the ProfileUnity Management Console from the AWS Marketplace. Alternatively, you can provision an EC2 instance manually and install ProfileUnity manually. ProfileUnity software can be found here. And you can reference the ProfileUnity installation and configuration guide located here

- Log in to the ProfileUnity management console and create a new configuration by either using the guided or manual configuration options.
- Once created, edit the configuration by clicking on the newly created configuration.
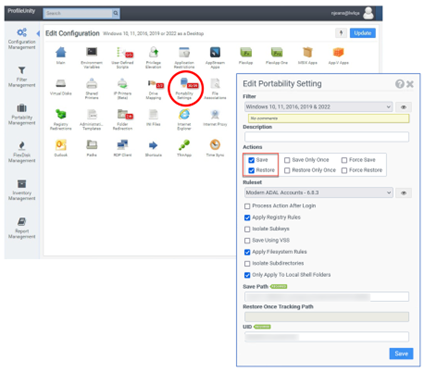
- Open the portability settings and determine which of the auto-provisioned settings you wish to implement. You can disable any settings you do not wish to capture. Ensure Save and Restore are selected.
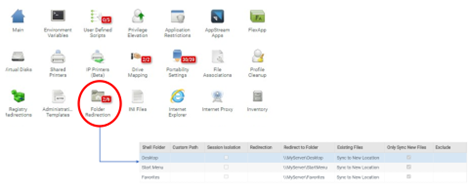
- Open the folder redirection section and determine which shell folders you would like to redirect.
- Configure any additional ProfileUnity settings that are pertinent to your organization’s requirements.
- When completed, select Update.
- Deploy your configuration to your ProfileUnity deployment path.
Configuration rules will be applied next time users login on their workspace. If you need assistance in configuring Liquidware ProfileUnity â„¢, contact your sales team or sales@liquidware.com.
Step 3: Deploy PeerGFS management server and agents
The PeerGFS solution consists of a Peer management console and Peer agents for each region where WorkSpaces are deployed. The agents are typically installed on EC2 instances (t3.xlarge recommended) and facilitate the replication jobs between the FSx for NetApp ONTAP instances.
- Deploy the PeerGFS management console from the AWS Marketplace.
- Deploy an EC2 instance in each region where WorkSpaces are deployed. Install the Peer agent on each of the deployed EC2 instances.
Note: When installing the Peer agent, you will be prompted to run the Peer service as a domain user. This is the same user that is specified in Step 7 of the Amazon FSx for NetApp ONTAP Prerequisites guide.
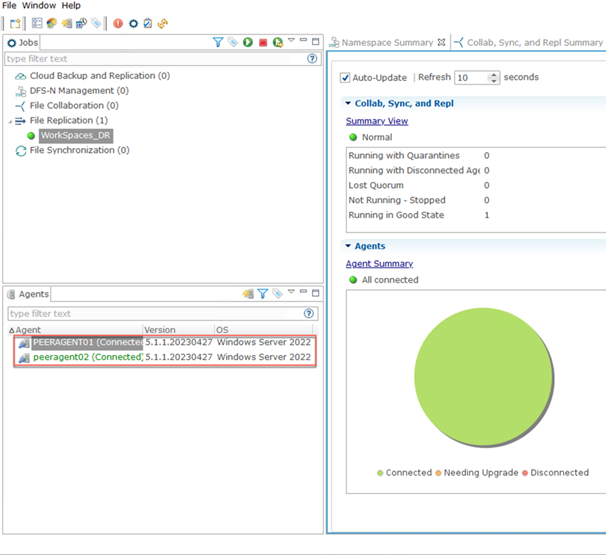
Once the agents are installed, log into the Peer management server and verify the agents are visible in the console.
Step 4: Connect agents to FSx for NetApp ONTAP
Each agent needs to be registered to an FSx for NetApp ONTAP file system. The following steps outline that process:
- From the Peer management console, open the preference menu and navigate to NAS Configuration / Amazon FSxN Configuration and select Create.
- Select the server hosting the primary Peer Agent. Provide the connection information for the FSx for NetApp ONTAP svm and select Validate.
- Repeat steps 1 & 2 to add the second Peer Agent for replication.
Step 5: Create a File Replication job
In this example, we’ll configure a File Replication job which enables one-way replication to a specified target. The target can be any addressable UNC path. Use File Replication jobs when you want to guarantee that no writes that occur on the target can be synced back to the source. In this design, only the source will be “active”.
When “active-active” (read/write everywhere) is desired where we want multiple instances to serve files to users and writes from any location can be synced to all other locations, use a File Synchronization job which enables omni-directional synchronization. Unlike File Replication, you must use one of our supported platforms for all targets.
- From the Peer management console, create a new File Replication job.
- Select the Peer agent from the primary FSx for NetApp ONTAP svm as your source, NetApp ONTAP for your storage platform, and select the credentials you provided in Step 4.
- For the Source Path enter the ProfileUnity storage location configured on the FSx for NetApp ONTAP svm.
- Select the Peer agent from the secondary FSx for NetApp ONTAP svm as your destination, NetApp ONTAP for your storage platform, and select the credentials you provide in Step 4.
- For the Destination Path enter the ProfileUnity storage location configured on the FSx for NetApp ONTAP svm.
- Select the following options for the File Metadata section:
- Synchronize File Security Information: CHECKED
- Enable synchronizing file security information in real time: CHECKED
- Enable synchronizing file security information with master host during initial scan: CHECKED
- Synchronize Security and ACL Options
- Owner: CHECKED
- DACL: Discretionary Access Control List: CHECKED
- SACL: System Access Control List: CHECKED
- Metadata Conflict Resolution
- Select master host for initial scan: Select primary Peer agent
- Synchronize File Security Information: CHECKED
- Select Finish.
At this point the file replication job will be created but not running. Before starting the job, we need to make a few additional changes.
- Right-click on the file replication job and select Edit Job.
- Use the following table to adjust the job settings for best practices:
| Section | Setting | Value | Description |
| General | Enable Multipart Transfers | checked | Transfers large files in multi-streamed chunks for optimized file transfer |
| Delta Replication | Enabled | checked | Syncs only changed file blocks rather than the whole file |
| Target Protection | Enabled | Dependent on org. preference | Retains copies of modified and deleted files for restoration. The default number of versions to keep is 3. NOTE: This setting can consume large amounts of storage. |
- Select OK to save the settings.
- Right-click on the job and select Start.
Your file replication job will begin and continuously monitor your file system. Files will be replicated from the primary FSx for NetApp ONTAP file system to the secondary in a single direction. Changes from the secondary file system will not overwrite those on the primary.
If you need assistance in configuring PeerGFS, contact your sales team or sales@peersoftware.com.
Testing
At this point, your deployment should be complete. Begin by logging into your primary WorkSpace, performing some modifications on our operating system, adding files to your documents folder, etc. Log out of your primary WorkSpace and log into your secondary WorkSpace. You should see the operating system changes and files added have replicated to the secondary WorkSpace.
Cleaning Up
- Open the EC2 Console in the primary region. Terminate the PeerGFS Management Server, ProfileUnity Management Server, and Peer Agent Server. Repeat this process for the secondary region.
- Open the FSxN Management Console. Delete the FSx for NetApp ONTAP volumes, svm, and file system in that order. Repeat this step in the secondary region.
Conclusion
In this post, we expanded on the existing multi-region resiliency offered with Amazon WorkSpaces by replicating an end user’s profile and data to a secondary region. Â
About the Authors
Robert Fountain is a Sr. EUC Specialist Solutions Architect with AWS supporting federal and non-profit organizations. Robert has over 12 years of experience in designing and implementing VDI solutions for his customers. In his free time, Robert enjoys traveling, skiing, and spending time with his family.
Mike Frost has been a Senior Solutions Architect at Peer Software since 2019. His career in IT began as a systems administrator in 1996, later specializing in storage and backup. Â In 2004 he moved to the vendor side serving in both pre and post-sales engineering roles with VARs and manufacturers in the storage, backup, archive, and virtualization space. At Peer, he helps customers design highly-available, collaborative file environments. He describes his work as “bringing files closer to people and things.” Mike lives with his family in Chicago.
Greg Peck is a Sr. Solutions Architect for Liquidware supporting federal customers. Greg has been with Liquidware for 5 years and previously used the Liquidware product suite as a consultant. Greg enjoys taking his Jeep Wrangler off-road and spending time with his family including their dog.


Leave A Comment
You must be logged in to post a comment.