One of the things I love about FlexApp is that it has taken the layering paradigm and essentially turned it on its head. We’ve all “grown up” thinking of layering as done in a particular way but FlexApp shows there are other ways of accomplishing the task of delivering applications dynamically. One of the critical designs of layering is figuring out what happens when files, folders or registry entries conflict. FlexApp uses a technology called Micro-Isolation to handle these types of conflicts. The technology was developed because of how FlexApp builds the view of the operating system file system and registry. It is a very different way of looking at how layers are laid down on the image and how conflicts are handled.
To understand Micro-Isolation, we have to understand how layering technologies address conflicting files and registry entries in the layers themselves. Here we are focusing on the file system but the concepts apply to the registry as well.
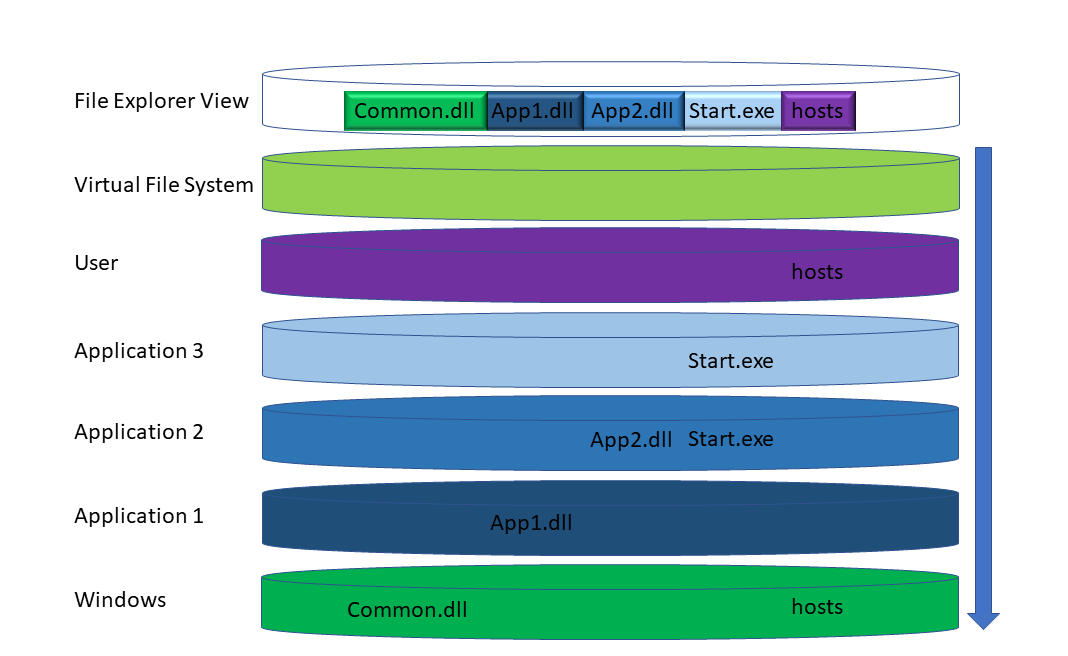
Layering products all use a mini-filter or filter driver that creates a virtual file system from disparate disks that Windows see’s as a single hard drive, the C drive. Traditionally the view of that file system is built on the fly. If you open file explorer and go to a folder that hasn’t been viewed before, the driver will read through the layers to find the appropriate files and folders for that view. It then caches those locations so it can access them directly next time. Sounds simple and efficient but under the hood it is a bit more complicated.
To build that on the fly view of the file system, the driver reads through the various layers and returns a single view to the OS and user. What happens if a file exists in two different layers in the same location? How does it know which one to use or show? This is where it gets interesting. Other layering products use a system called layer priority. Each layer is assigned a priority and this priority determines where, in the stack, the layer is located. This priority is typically determined by layer creation date and time. The newer layers have a higher priority than older layers. The operating system is always the bottom layer (lowest priority) and the user layer, if one is there, is always at the top (highest priority). When the driver wants to locate a file or folder for the first time, it starts from the top of the stack and reads down.  It either finds what it’s looking for or it doesn’t. The key is that it stops looking when it finds the first instance of a file in the stack. It has no knowledge that there may be other files with the same name and location in lower priority layers.
There are other concepts that go along with the layer stack concept like delete tokens and switching layer priorities to eliminate some conflicts.  I could go more in depth but the above gives a good understanding of layer stacks. Now let’s discuss how FlexApp handles its virtual file system.
FlexApp uses a filter driver to give Windows a single view of the various disks in play just like other vendors, but how the view is generated though is fundamentally different though. There is no concept of a layer stack. It is more like puzzle pieces coming together. It is a flat view versus a hierarchal view. This changes how the layers interact with the existing file system and operating system.

Because of the flat nature, certain concepts are very different than way layer stacks work. One of the biggest concepts to understand is that FlexApps do not supersede files in the image. If a file exists in the image and in the FlexApp, the image wins. Another concept to understand is that when a FlexApp is attached it is using reparse points to redirect to the appropriate folders and files. The filter driver does not need to need to build the file system view on the fly. It already knows where the files and folders are and will redirect file system calls directly to the appropriate FlexApp.
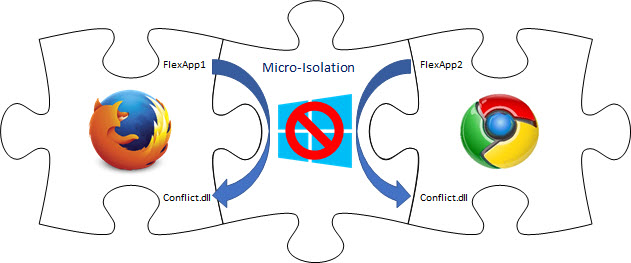
We know that a FlexApp will not overwrite a file or folder that originates in the image but what about FlexApp to FlexApp conflicts? This is the purpose of Micro-Isolation. When a user logs in or, if they are computer assigned FlexApps, the machine boots up and the FlexApps are mounted, there is a process happening called FlexApp Replay. Replay is doing a few things but most importantly it’s creating the reparse points, setting up the registry appropriately and finding the conflicts for the Micro-Isolation feature.
The way Micro-Isolation works is by redirecting the call to the file in conflict back to the same FlexApp. For example, let’s say FlexApp1 and FlexApp2 both have a file located in c:\test\Conflict.txt. If FlexApp1 makes a call to that file, the call is redirected back to the FlexApp1 layer and pulls the Conflict.txt from there. If FlexApp2 calls Conflict.txt, it gets it from the FlexApp2 layer.
The list of conflicting files is generated at user login or computer boot with one exception; when a FlexApp is flagged as Click-to-Layer. The Click-to-Layer FlexApp’s conflicts are determined when it is opened. At that time, the FlexApp Replay process generates a new Micro-Isolation list that takes the Click-to-Layer FlexApp into consideration. For example, if a user has five FlexApps assigned to them and three are layered in at login and the other two applications are Click-to-Layer, the three applications mounted at login are queried to find conflicts for Micro-Isolation. Later in that session, the user starts one of the Click-to-Layer applications, then the Replay process redoes the list and now those four applications are set for Micro-Isolation if needed. It would be the same for the other Click-to-Layer application when it is started in that session.
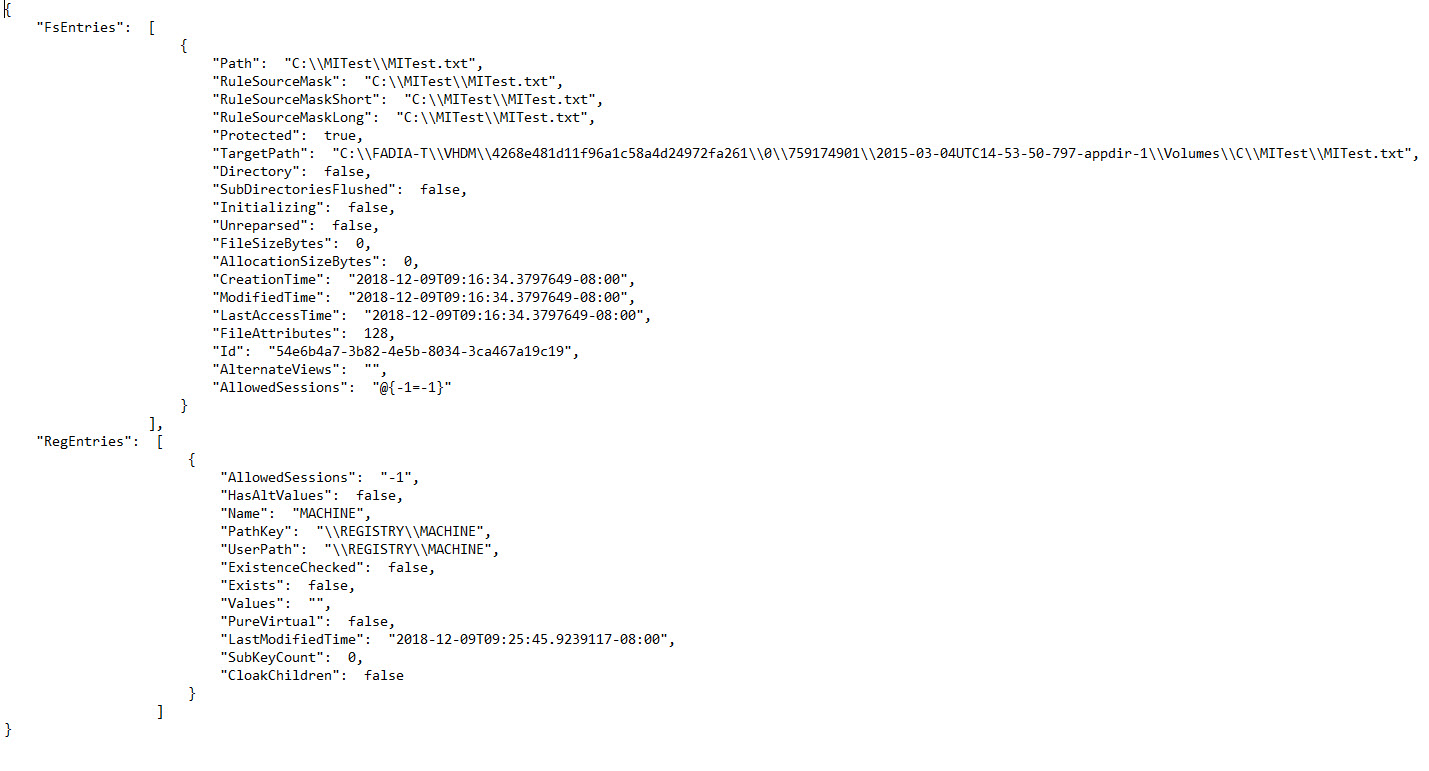
Because the Micro-Isolation conflicts are determined dynamically every time, the entries are stored in memory and cannot be modified. To see the conflicts that Micro-Isolation is monitoring, a user or administrator can invoke the following PowerShell command:
Invoke-RestMethod https://localhost:9072/api/microisolationentries | ConvertTo-Json | out-file $env:TEMP\microisolationentries.txt
The exported text file will look something like this:
Let’s be clear about what Micro-Isolation is and is not. Micro-Isolation is designed to handle file and registry entry conflicts. It is not application isolation like App-v or ThinApp. FlexApps are treated and act as if they are installed locally to the operating system. They have full access to the operating system and full access to other applications if applicable. The operating system has no idea these applications are not actually installed on the C drive. Isolation technologies like App-v and ThinApp are designed to put the entire installation of the application in an isolated bubble and then, if you want it to communicate to other applications, the administrator has to purposely edit the package and “poke holes” in the isolated bubble. Micro-Isolation is designed the other way around. It only isolates the files and registry entries that have conflicts. If there are no conflicts between layers, then Micro-Isolation doesn’t do anything.
The next question that comes up a lot is, can we use Micro-Isolation to deploy applications that require different versions of Java or some other underlying supporting technology. For example, could FlexApp1 have Java 6 in it and FlexApp2 have Java 8 in it. Technically, you could but it would be a very bad idea. Micro-Isolation, at such a large scale, would cause very high CPU usage. It must work hard to redirect every single file call appropriately. It has to determine what is needs to be redirected on a file by file basis. This is one of the reasons Liquidware highly recommends putting supporting technologies like Java, Visual C++ runtimes, .NET, etc in the standard image.


[…] has a lot going for it. Architecturally it’s very different than other layering technologies. This difference gives FlexApp a much better […]